The first steps are always the hardest – ask a toddler, you’ll see. Photography is no exception to this rule. If you want to be good at something, you have to know the basics first. In this article we’ll give you a little jump-start by leisurely talking about shutter speed, aperture and ISO, and more importantly about how they work together to produce your images. Understand this and you’ll be taking wonderful pictures in no time. Say cheese!

Well boys and girls: looks like we’re going to have to keep ourselves busy for a while longer – it’s either that or chewing the furniture. And since my job basically ceased to exist in this pandemic, I might as well lend you a helping hand and teach you something else about the wonderful world of photography. A while ago, I published some tips on how to start taking better travel pictures. These were exclusively about the things happening in front of your camera. Technically you didn’t have to understand anything about your gear to make them work. Today it’s time to dig a little deeper. We’re taking a look inside the camera to find out how your settings determine your image. This might sound a little scary for absolute beginners, but don’t panic. To keep things as accessible as possible, I wrote down everything in the simplest terms I was able to come up with. This way, even idiots who lost half a box of crayons in their nostrils as a toddler will be able to keep up. Yes, that includes you as well Clever Clyde – keep doing what you do bro.
Photography for beginners: everything about shutter speed, aperture and ISO
Most cameras come with a wide array of buttons to play around with. Luckily – just like the ones on your boy/girlfriend – only a few of them are actually important. Apart from your subject, available lighting and lens, only three things determine how your picture will look. In no particular order, these are your shutter speed, aperture and ISO. Every possible combination of those three will make for a different exposure. And since photography literally means “writing with light” in Greek – invented by famous philosopher and wedding photographer Aristotelelens – you better get that stuff right because it will make or break your images. Let’s start our lesson by going over these three variables separately and see what they do. Afterwards we’ll take a look at how they work together. Let’s get on with it, shall we?
1. The shutter speed determines the amount of movement in an image

Unless you’re crazy about big black squares, light needs to be able to reach your sensor to take a picture. The mechanism responsible for this is your camera shutter. This is basically a pair of mini blinds able to open and close incredibly quickly. The longer the shutter stays open, the more light can get in. This logically means you will have to use longer exposures in low light conditions. The downside of this is that leaving your shutter open for a longer time causes more motion blur. That happens because the longer the exposure, the more time your subject will have to move or start picking its nose. You’ll have to find a balance between focus and exposure in some situations.
Different circumstances require different exposures. Want to take a landscape photo at night? Put that shit on a tripod, and leave the shutter open for a couple of seconds. Want to make a crisp image of a bunch of mating wildebeest? Use a fast shutter speed to immortalise this spectacle in all its natural glory.


Captions: The panoramic pic of Taipei was made on a tripod with a shutter speed of 2 seconds. The movement of the dancers on the left and right was frozen by a very short shutter speed (1/1000 of a second at least), while the shutter speed of the middle pic caused the motionless girl to be focused, while the guy moving in the foreground has a motion blur. The addition of motion blur can be a deliberate artistic choice – the carnival pic under the chapter heading is a good example of this.
The choices you make always depend on your subject, the light conditions and the atmosphere you want to convey. A shutter speed of 1/30 of a second is enough for most (sober) hobbyists to shoot a handheld photo of a still-life, but not nearly enough to photograph a running football player from the stands. You’ll need at least 1/500 of a second for that – preferably aided by the VR-function (vibration reduction) of some lenses.
Want to keep your shutter speed constant? Put your glorious Nikon in the S-mode (for some bizarre reason, this becomes the Tv-mode on stupid Canons). This way your shutter will always open at the same speed, while your camera takes care of the aperture needed for a decent exposure. Speaking of which…
2. The aperture determines the depth of field

The second important factor contributing to you images is the aperture. Simply put, this is the size of the hole letting the light through: the bigger the hole, the more light. To express this in a numeric value, we use an f-number. The larger this number the smaller the hole (ah, the logic) and the less light will reach your sensor. An aperture of f/2.8 lets in quite a lot of light, while an aperture of f/8 lets in relatively little. In darker circumstances, you’re better off using the f/2.8. So to summarize: aperture is not about the length of the exposure, but about the amount of light that can enter the camera on the exact same moment. Are you still with me?


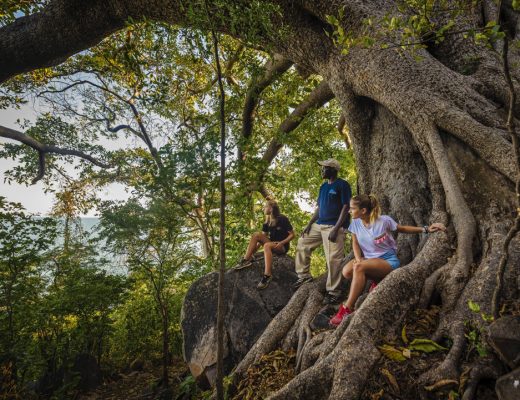
Caption: To show the effect of different apertures on the same setting, I lured my always wonderful friend Julie deep into some random forest. On the left side, you see her light up with joy, because an aperture of f/1.4 causes the background to go nice and blurry. On the right she’s getting mildly annoyed because she thinks f/7.1 causes too much depth of field for most portraits. Julie is right. Listen to Julie.
The aperture has a second very handy effect. The tighter your hole (sorry), the larger the depth of field on the resulting image. The depth of field is the zone in front and behind your subject that will be more or less in focus as. When you’re taking a picture of a face from about a meter away with an aperture of f/1.4, only the eyes will be in full focus. When you’re taking the same pic with an aperture of f/16, the whole background will be focused as well. So the preferred aperture depends on both the available light and the feel you want your picture to have. Why a smaller aperture causes more depth of field? Who knows? Ask your physics teacher.


Caption: Here you can see how the aperture affects the atmosphere in different settings. On the left, the ravishing Antwerp celeb Sihame El Kaouakibi was pictured with a large aperture, which focuses all the attention on her eyes and her majestic curls. On the right the also nice I guess Dutch singer Rick De Leeuw was shot with a smaller aperture, which keeps the whole room into focus. For wide landscape shots like the one above, a smaller aperture is preferable.
Want to determine the aperture yourself, but don’t want to worry about the shutter speed? Put your camera in the A-mode (Av-mode on Canons – aren’t they ever so special). Now you can decide the amount of depth you want while the camera takes care of everything else. This by the way, is my favourite mode. I use it in nine out of ten cases. Lots of people think manual mode is the holy grail of photography, but to me that’s mostly a load of pretentious horseshit. Only in a couple of very specific circumstances are you better off in manual mode.
3. The ISO determines the sensitivity to light and the amount of grain in the image

The ISO-value is the last important element we’ll be talking about. A camera’s ISO is a variable number starting at ISO 100, and determines the sensitivity of your sensor to light. The higher the ISO, the more sensitive your camera will get – a bit like me on the beach with varying amounts of sunblock – and the less light will be needed for a good exposure. The more attentive readers will quickly deduct they will have to use a higher ISO in low-light conditions.

Caption: The picture of the ballerina on the ground was made with an extremely high ISO 8000. This is never advisable, especially not with a cheap camera. In the darker areas, you can really spot the loss of quality. The girl with the pigeon was photographed in a circus with an ISO of 2500. To get enough light in, I had to use a slightly longer shutter speed, causing the flappy bird to go blurry.
The downside of a high ISO is that it puts more “grain” in your picture. This lowered image quality gets particularly bad when you want to lighten up dark parts of the image in post-production. How bad it gets depends on the quality of your material. Cheap cameras will start having troubles at no more than ISO 1000, while the newest full frame bodies can keep shooting almost perfect pics at ISO 2000 or higher.
4. The most important lesson in photography

This picture of a sad chimp (out of bananas) was made with a high ISO as well. The dark parts of its fur show slight loss of quality.
Now that we know what shutter speed, aperture and ISO do, we can start looking at how they work together to create a (hopefully) decent picture. Pay close attention now by the way, because this might be the most essential thing to grasp in all of photography. Here goes. Shutter speed, aperture and ISO are perfect communicating vessels. So to get to the same exposure (and I’m butchering Newton’s third law here), every adaption of one of these three values can be compensated by an equal and opposite adaption of one of the others. Once you understand this, you can start playing with the style of your images.
Let’s showcase this with an example.
Imagine being the photographer on a dancing recital. There’s a number of ways to make good pictures here, and they depend on your preferences.
Want to get super crisp images of the dancers (as in: want to freeze their movements in time?) Work with a very short shutter speed and compensate the loss of exposure with a larger aperture or higher ISO.
Want to capture the fluidity of the motion (by putting some deliberate motion blur in the performance, making it all swirly)? Use a longer exposure and compensate with a lower ISO or smaller aperture.
Did they suddenly dim the light for a more emotional dance? Raise your ISO, open your aperture and if possible use a slightly slower shutter speed.
4. Let’s summarise


When you know what ISO, aperture and shutter speed are and do, and when you understand how they can be combined, you’ll be able to take great pictures in almost every situation. Take note of the word “almost”. A camera is not a magic wand, and all equipment has its limits. People who love uninspired quotes often state that “the camera doesn’t make the artist”. And while there is certainly a grain of truth in this, the camera can surely make things way easier for the artist if it’s any decent. The more you invest in the right material, the fewer limitations you will have in certain situations. You can be the world’s best photographer, but if you have a shitty camera with a kit lens, you won’t be able to take a crisp picture of a public speaker in a dark hall without using a flash. Get to know the limitations of your equipment by practicing in as many different situations as possible. You’ll soon find ways to adapt and work around these limits, and in doing so you will improve as a photographer. Practice always makes perfect. I wish you a wonderful photographic journey, and feel free to tag me in your most awesome creations.
Got some specific questions on photography? Put them in the comments below or send me a message on Instagram.
Are you already dreaming of your next far away destination, now that the vaccines are on their way? Then read my stories on Edinburgh, Vietnam, New Delhi, Hong Kong or Malawi.

4 Comments
Ramael Marc
January 4, 2021 at 4:55 pmHeel interessant en leerrijk , maar als ik perfecte foto’s wil vraag ik jou wel om ze te maken .
Jonathan Ramael
January 4, 2021 at 5:46 pmKomt in orde 😉
Nathalie Van Eyck
January 4, 2021 at 5:09 pmGeen idee waarom ik dit hele artikel gelezen heb, als ik geen andere camera heb dan die van mijn smartphone :p. Maar dat weten we dan ook weer!
Jonathan Ramael
January 4, 2021 at 5:46 pmAls je een degelijke smart phone hebt en naar de pro-modus van je camera swipet, kan je die drie waarden ook instellen. 😉